Creating & Editing Your MMIO Store
A Step-by-Step Guide To Setting Up Your MMIO Ecommerce Store
Starting an e-commerce store has never been easier. You no longer have to worry about coding a super-fast optimised web store. With MMIO, you can get your store up and running within the next hour!
In this article, you will learn the following:
Creating you store
Editing your store
FB & Messenger Marketing Setup
SEO Settings
Custom Domain Setting
Payment Setting
Creating Your Store
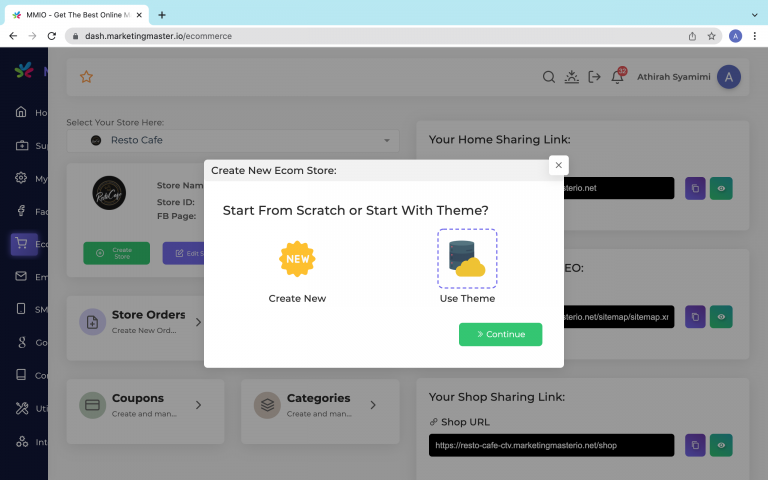
Go to Ecommerce > Create/Edit Store

You will be able to choose between creating your store from scratch or use one of our converting theme templates.
If you're new to web design, we recommend starting with one of our templates. You will have a fast and optimized professional store in no time. Plus, all themes are fully customizable for you to brand them as your own.
We have 7 templates for you to choose from and we’ll be adding more as time goes on.
Resto Cafe
Chef Food
Chucks Burger
The Chef's Cake Store
Beauty Products Theme Online Shop
BlueWow - Tech Accessories and Gadgets
Living Souls - Furniture Template Online Store
To choose a theme,
Click Create Store

Select Use Theme

Preview any themes to see how it looks like

Click Use Theme

Click OK to confirm

Select sections you want to replicate from theme

Click Finalize
Once you’ve chosen a theme, it’s time to set up the nitty gritty store details.
Editing Your Store
No two stores are the same. With MMIO ecommerce store edit, you can change all the information to match your store's branding - from Store Name and URL to Logo and Favicon.
In your ecommerce store, select Edit Store

You will be able to change the following:
Store Name

Store Alias (marketingmasterio.net subdomain)

Store Address and Contact Details

Upload Store Logo and Favicon

Link FB & Messenger Marketing. Learn how to set up FB/Messenger Marketing.

Enter SEO Settings.

Configure Custom Domain Settings. Learn to set up custom domain here.

Click Next
Configure Payment Setting
Choose your store currency from the drop-down menu

Select all the applicable payment methods you accept.

Note: MMIO accepts 7 payment methods such as Cash on Delivery, Manual Payment, Paypal, Stripe, Paymongo, Gkash Malaysia and RazorPay.
You can also customize your call-to-action (CTA) buttons

Once you are ready, click save.

Congratulations! Your store is successfully created.
You can now create store pages, add products, categories and shipping methods in order to get your store ready for launch.